
Clash for Desktop version (Windows/Mac/Linux) Configure network
Who is Clash?
Clash for Windows is a fork of graphical Clash running on the desktop. Clash is a rule-based cross-platform agent software core program. Support SS/V2ray/Trojan protocol.
This tutorial is a desktop tutorial Windows, Mac, and Linux unified tutorial, because the operation method is the same. Interface for reference for MacOS
This client fully supports our product and has continuous updates.
Recently, 0.9.16 and above 0.9.19 have configuration problems, causing all nodes to
timeout. Check out the Restoration Tutorial section below.⚠️ Note: Be sure to restart the computer after installing clash. May not be able to subscribe and use otherwise
Download software
Clash For Windows is open source software
-
Find the latest version to download in NetNet Network Disk or Github, which can be downloaded according to your device processor architecture to download The following is an explanation of each version
| Version naming (see the bold part) | Description | | :------------------------------------------------ | :- ------------------------------------ | | Clash.for.Windows.Setup.0.xx.xx.**arm64.exe** | ARM Processor Windows OS | | Clash.for.Windows.Setup.0.xx.xx.**exe** | 64-bit processor Windows operating system (commonly used) | | Clash.for.Windows.Setup.0.xx.xx.**ia32.exe** | 32-bit Processor Windows OS (Obsolete) | | Clash.for.Windows-0.xx.xx.**dmg** | Apple MacOS system (generic) | | Clash.for.Windows-0.xx.xx-**arm64.dmg** | Apple MacOS system (M1 ARM processing) | | Clash.for.Windows-0.xx.xx-**x64-linux.tar.gz** | Linux 64-bit desktop system |
✅ This client fully supports our product and has continuous updates.
NextNet cloud disk download clash (Please select the relevant system platform📂 for After Windows/Mac/Linux ➠ 📂 clash download)
GitHub latest version download (select latest version)
PS: After some users use Clash to configure subscriptions, they cannot access the Internet after turning on the proxy. Please restart the Clash software. The pro-test is effective.
Method 1: Obtain the subscription address and configure it automatically (four steps)
Step 1: Get Subscription
Enter https://go.nextnet.one (Figure A0) in the computer desktop browser, select Subscribe ➔ My Subscription, find the “One-click Subscription” button, and click “Import to ClashX”, the Clash for Windows desktop app will pop up automatically, the automatic import is successful (Figure A1), and the connection is running (Figure A2). Select “Configuration”, and finally choose your own reasonable node (Figure A3), just like this is done.

Subscriptions imported into Clash for Windows (Figure A0)
⚠️ IMPORTANT NOTICE:
All subscription addresses are as important as your password, please do not disclose it to others, otherwise your account may be blocked.
Step 2: To check whether the automatic import is successful

Successfully imported into Clash for Windows (Figure A1)
Step 3:To select the appropriate node

Select the node Clash for Windows (Figure A2)
Step 4: To open the system agent, and the acceleration service is successfully opened. (Required, otherwise it cannot be used)

Enable proxy acceleration service Clash for Windows (Figure A3)
~ END ~
🎉
Method 2: Manually configure the connection
Due to system or browser security and compatibility issues, the APP may not be able to be activated, so that the automatic configuration cannot be completed. In this case, we need to configure it manually.
- Enter https://go.nextnet.one in the browser on the computer desktop, select Subscribe ➔ My Subscription, find the “One-click Subscription” button, and click “Copy subscription address”. Figure 4
Figure 4 Browser input "https://go.nextnet.one" to copy subscription
⚠️ IMPORTANT NOTICE:
All subscription addresses are as important as your password, please do not disclose it to others, otherwise your account may be blocked.
-
Open the Clash For Windows application, select “Profile / Configuration” in the sidebar of the application, as shown in Figure 5, and paste the subscription address just copied into the URL bar. Click to download “Down / Download”:
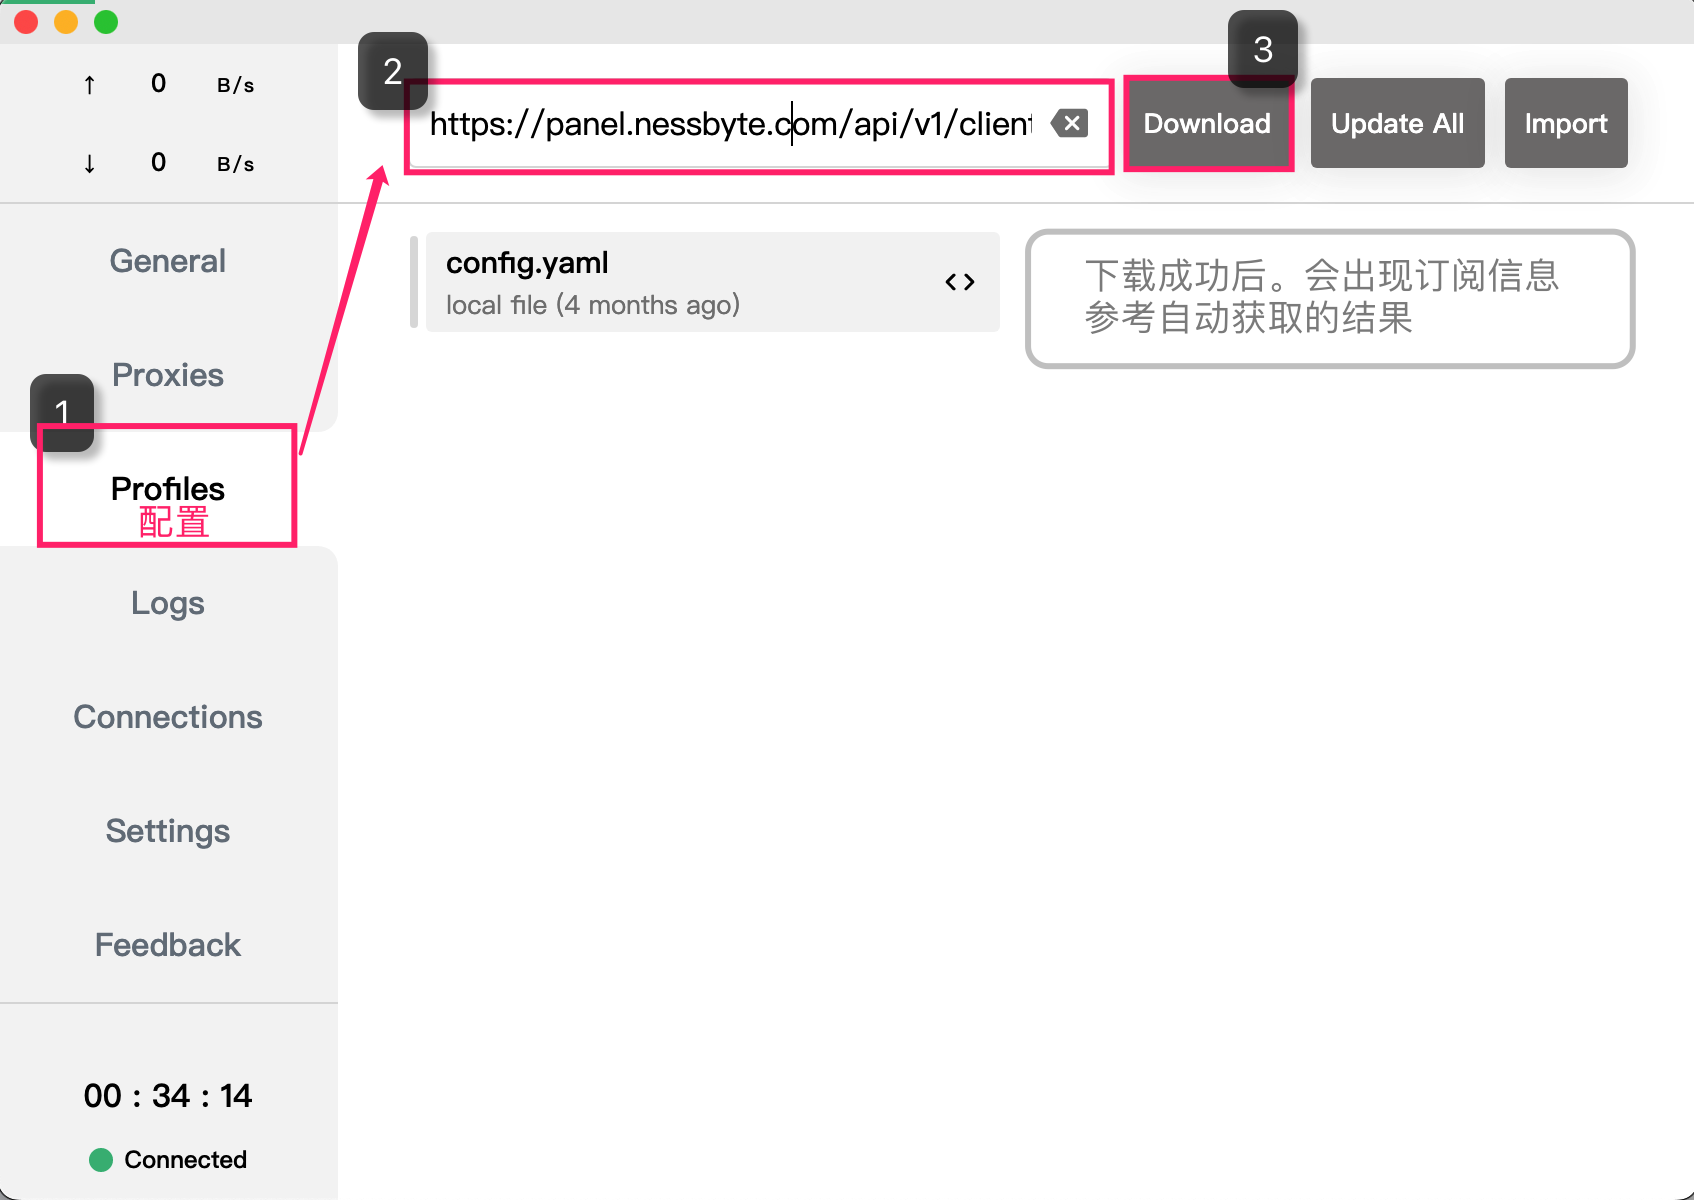
Figure 5 Paste the subscription address -
If Success appears, it means success, and the application has obtained the server node data in the NextNet subscription address. As shown in Figure 6,
If the download fails, please try the Download again. If it is not a network problem, please check whether the copied subscription address is correct.

Figure 6: SUBSCRIBE SUCCESSFUL
- After the subscription is successful, please select “Node” and “Enable System Agent”, the operation is the same as method 1 (Figure 2 and Figure 3).
~ END ~
🎉